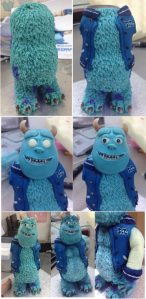
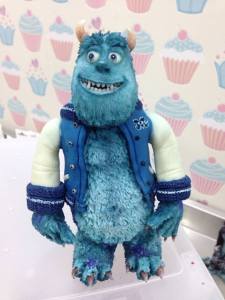
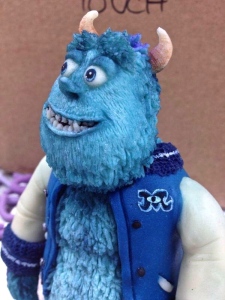
Sulley was the decider for me on whether or not I should enter the competition. I thought that there was no point in entering if I couldn’t get the main characters to look as they should. So I was terrified of starting to make him!
1. First I coloured some white modelling chocolate pale blue and added a little bit of green food colouring to give him his infamous turquoise/blue colouring. I measured this against my other characters so I could judge whether the amount was enough to make his body, feet, arms, hands tail and head. Sulley is noticeably bigger than the other characters.
I then separated from the piece two pieces for his feet, two pieces for his arms and hands, a piece for his tail, a piece for his head and a spare piece for any little extras (eyebrows, nose, eyelids).
With my modelling chocolate leftover to make his main body – I rolled a large ball. I then continued to roll so as I ended up with a short fat sausage shape. Using my fingers I then slightly narrowed him at the waist. I then slightly flattened the half above his waist (his chest). Then using my fingers I rubbed and smoothed the centre of his chest and just above his waist line to give the impression of pectorals. Again using my fingers I rubbed either side at the very top of his chest to give a slight neck. This is where is head would be secured later on. I then put his body to one side.
2. I then took the two pieces of modelling chocolate that I’d put aside for his feet. I rolled each one into a short fat sausage, checking them for size against his body. Once I was happy I took a small square cake board as I wanted something to stand him on whilst I worked on him. I pressed both pieces of modelling chocolate against the board and bent them so as 1/3 of the length was for his feet and 2/3 was for his legs. I then gently flattened his feet using my fingers. Taking a small palette knife I then cut into the front of the feet to create three toes. I smoothed and rounded the ends of each toe with my finger. Using a Ball Tool I then created a hole in the end of each toe for his claws to be inserted into. I then went back into each hole with my Ball Tool and gently pushed upwards and around to lift the paste above and create a contour.
I then took six small pieces of white modelling chocolate for his claws and rolled them into small balls. I then rolled one end into a point between my fingers. I lightly dabbed the inside of the holes I’d made in his feet with glue. I then carefully inserted a claw into each one. Once dry I then dusted these with Milk Chocolate Rainbow Dust, leaving the tips of the claws white.
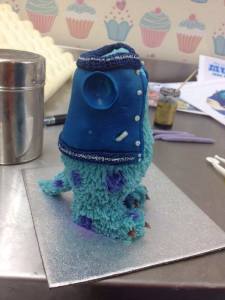
3. I then brought the main body back over and held it above the legs to see where I wanted to secure them. With my palette knife I then carefully cut off the tops of the legs at an angle so as the main body would sit on top of them and give a slight belly over hang. I then dabbed the tops of the legs with glue and sat the body on top. Keeping hold of the body, I carefully worked my way round with a Dresden Tool and damp paintbrush blending in the joins. This helped it stay more secure. I then carefully positioned two small pieces of sponge on top of his feet so as they were touching his under belly and left him to dry for an hour.
After an hour I snipped all over his body, legs and feet with a small pair of scissors to create his hair. Don’t worry about going over the detail you’ve created i.e his pectorals and his raised toes – the point of making these was to give the impression that they’re there and give him some slight definition.
Using Lavender Edible Art Dust I then gave his body and legs some various sized ‘splodges’ (don’t do these on his chest or stomach as these are bare).
4. I then made the colour for his jacket from white modelling chocolate using Navy Liquid Food Colouring with a little bit of Ice Blue to brighten it up. From this, I rolled a ball before placing it on my work surface and rolling it out thinly. I then held this against his body to see the size I need it to be. With a Cutting Wheel I then cut out a rectangle to size. I wrapped this around his body again to check where I wanted the jacket to come to on his front. I then trimmed where necessary. I then dabbed around his body with glue and secured the jacket around him. Once stuck to him I was able to trim around the neck using a Cutting Wheel so as there would be space for a collar. With a Ball Tool I then made to large indents either side where his arms would later be positioned. With a Dresden Tool I then made markings to create a trim around the bottom of his jacket, two trims down either side of the opening of his jacket and two pockets on either side.
I then took twelve pieces of white modelling chocolate and rolled them into balls. I then attached four down one side of his jacket next to the trim and four down the other using glue. Once dry I painted four black for buttons/poppers and four silver for the inserts. Using a cocktail stick I then pressed a small hole in the centre of the silver ones. With the last four I then made two more poppers and two more inserts. These are secured on the bottom trim of his jacket closer together than the others. I then took another two small pieces of white modelling chocolate and made these into two small rectangles to line his pockets. I trimmed these to size with a Cutting Wheel before securing them with glue.
I then coloured a small amount of white modelling chocolate a deep Navy blue. This was for the cuffs on his sleeves, around his collar and the bottom trim of his jacket. I rolled this out with a Rolling pin to the same thickness as his jacket. I then cut out two long thin rectangles. One for his collar and one for the trim around the bottom. Using my Stitching Wheel I gave each rectangle a knitted jersey effect by repeatedly running the wheel over and over. I then measured them by putting them in place and then I trimmed them to size using a Cutting Wheel. I then secured each one with glue. The bottom trim doesn’t reach the ends of his jacket, it only goes up to where the poppers and inserts are. With a Dresden Tool I then secured the collar further by gently pushing the top of it down into the inside of his jacket. This also blended the two together nicely.
I then painted the Monsters University ‘M’ logo onto his jacket using Navy and Snow White Rainbow Dust mixed with isopropyl alcohol. I also used the white to paint a thin white line along the centre of his collar and the bottom trim of his jacket.
5. Taking a small piece of my blue modelling chocolate that I’d left spare from his body, I rolled a sausage for his tail. I then placed it on my work surface and continued to roll so as it narrowed into a point at one end. I then secured this with glue and blended it into his body using a Dresden Tool and a damp paintbrush. I then snipped in the hair and added some purple ‘splodges’.
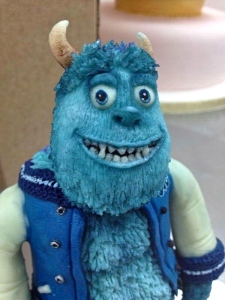
6. I then took the piece of modelling chocolate that I’d left for his head and rolled it into a smooth ball. I checked this for size by holding it against his body. Once I was happy I then slightly narrowed the ball by rolling it in between my hands. Using my fingers I then gently flattened what would be the top of his head. Then I gently rubbed the sides of his face to lightly flatten them and gave him a more chiseled jaw line. With my Ball Tool I then made his two eye sockets. I carefully pressed in between the two sockets with my finger to give him a slight raise. I then took two small pieces of my spare blue coloured modelling chocolate, rolled them into two small balls and flattened them before securing them with glue above the eye sockets for eyebrows. With a Dresden Tool I then marked out the shape of his mouth. I then dug the inside of it out carefully using the end of my Dresden Tool. I then went the entire way round the mouth very gently pressing my Dresden Tool outwards to give him a slight top and bottom lip. I then marked two smile creases. Using a damp paintbrush I smoothed the inside of his mouth before painting it with Black Rainbow Dust. I then rolled out twenty tiny teeth from white modelling chocolate. Two of these were slightly larger than the rest and pointier like fangs. I then secured all the teeth into position by dabbing the inside of his mouth with glue and then carefully picking up each one individually with a cocktail stick.
I then rolled two small balls from my white modelling chocolate for his eyes and secured them in the sockets with glue. From my spare blue modelling chocolate I rolled a small ball for his nose, I then carefully flattened this at the top and bottom, making the top part almost flat and the bottom flattened at an angle. I dabbed this with glue and placed it on his face before every so carefully blending in all the edges with the end of my Dresden Tool. Once secure I made two nostrils with a cocktail stick. I then took two small pieces of blue modelling chocolate and made his eyelids by rolling two small balls, flattening them and cutting out two eyelid shapes with a Cutting Wheel and glueing them on to the top of his eyes. I then painted all the detail of his eyes using a fine paintbrush.
Using my Ball Tool I created two small indents either side of the top of his head to secure his horns into. I rolled two horn shapes from my white modelling chocolate and glued them into the indents before using my Dresden Tool to blend the edges. Once dry I dusted these lightly with Milk Chocolate Rainbow Dust, fading dark to light at the ends.
7. Using a small pair of scissors I then snipped all over the back of his head up to his eyebrows and then also carefully snipped into his eyebrows. On his face his hair is thickest/hairiest at the bottom on his chin and underneath. The rest of his face is still hairy but a lot flatter and smoother. So first I snipped hair underneath his chin and on his chin bringing this around the sides until it met the hair at the back. For the rest of his face I carefully held one point of my scissors and used it to mark in lots of little hairs. I did this in a careful stroking motion. I brushed away any bits of modelling chocolate that appeared with a dry paintbrush as I went along.
8. Next, with my Navy Rainbow Dust I dusted all the shadows and contours on his face, body and feet. I went in between his toes, in between his legs, under his belly, around his thighs, emphasised the pectorals I’d marked out earlier, gave the impression a belly button, gave shadowing under his jacket, on his neck next to his collar, on his fur at the sides of his jacket, made his eyebrows darker so as they stood out from his face, his ‘beard’, under his chin, around his horns, his eyelids, the corners of his mouth and the back of his head. (Pretty much everywhere!)
9. I then took the two pieces of modelling chocolate that I’d left over to make his arms and hands from. From these I rolled two sausages. I held these against him to check the size and length. I trimmed them if needed. I then lightly flattened one end on each for his hands. I narrowed wrists using my palm and finger. Using my fingers I then shaped the ends for the hands making sure that the middle of them was the longest part for his middle finger and there was a shorter side on each for where his thumbs would be. With a pair of small scissors I then cut in three fingers and thumb on each. With my Ball Tool I made an indent on the end of each finger in which I would insert a claw. I then turned the hands over and made markings with my Dresden Tool to create a palm. With my scissors I then snipped the hair all over his hands and fingers leaving the palms of his hands bare as well as the rest of his arms. I then rolled eight small balls for claws from my white modelling chocolate. I narrowed these at one end using my fingers and then secured them in the indents on his fingers with glue.
I then took a piece of white modelling chocolate (large enough to roll out two sleeves from) and rolled it out thinly using a Rolling pin. Once rolled out I placed the two arms on the paste to see how long I needed the sleeves to be. I then cut out two rectangles and dabbed them with glue. I placed each arm on top of one end of a rectangle. I then rolled the arms up into the rectangle to create sleeves. I trimmed off any excess and pressed the join together before blending it in using a damp paintbrush. With my Dresden Tool I then marked a few creases up each sleeve.
I then dabbed the two large indents I’d made on the jacket with glue and pushed each arm inside and secured them further by blending the joins together with a damp paintbrush. I then left these to dry for a while.
Once dry I took the deep navy coloured modelling chocolate that I’d used for his collar and jacket trim earlier. I rolled this out with a rolling pin thinly. I then cut out two thin rectangles. Using my Stitching Wheel I then gave them the jersey knitted effect like his collar and trim. I then carefully attached these around the ends of each sleeve with glue, trimmed off any excess with a palette knife and disguised the joins with a damp paintbrush.
Finally I dusted one purple ‘splodge’ on each hand to finish him off.
I had now decided that I wanted to enter the Competition.

